Modern Office Add-ins: A world without Clippy and COM
-
Dan


What do you think of when you hear ‘Office Add-ins’? Do you have nightmares about the twisted metallic face of Clippy who desperately wants to overwrite your stuff? Are you a developer waking up in cold sweats over COM and pointers-to-pointers, and the dread of having to rewrite your code for every version of Office? Fear not friends, for we now live in the future and there is a new way to build Office Add-ins and it is awesome!

So you might be pretty proficient in Word already. Sure, there’s a load of tabs you never go in and buttons you never press but you can get documents out and do your job. So why do you need more? Here are some benefits of having an Office Add-in just for your business:
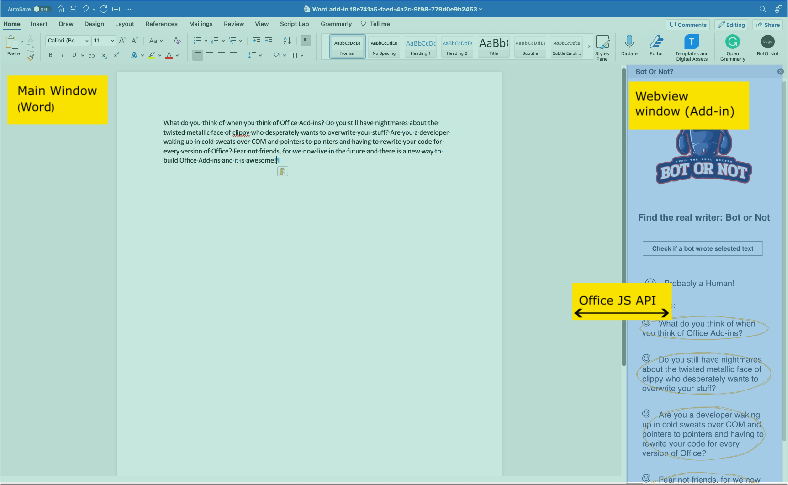
Microsoft made a really exciting design decision here, and the first thing to really understand is your add-in runs in an embedded browser window, regardless of if you’re in the web or desktop version. This means that anything you can put into a browser window you can put into your Add-in. And more than that, it means you can use your favourite web technologies to build your add-in with no barriers. We chose to use React, but you could use Angular, Vue, Svelte, plain Javascript, or even have a go on whatever new web framework is out this week. This means all of those web development skills you or your team have can be used to build your add-in. It also means you can reuse components across your add-in and your web app, which is a huge win for maintainability.
If you’re running the web version of Office, the add-in will be hosted in an iframe, so the browser you are using will be rendering it. If you’re running the desktop version, the add-in will be hosted in a webview and embed the browser engine of the operating system. The different web browsers are more or less the same at rendering pages these days, so you can be fairly confident that your add-in will work and look the same across all platforms. This is massive.
Word is running in its own process, and the add-in is running in an iframe or webview (which is another process), so the missing piece of the jigsaw is how we get those two things to talk to each other. This is where the Office JS API comes in. It provides the bridge between the two processes and allows you to get data in and out of the document and do whatever manipulations you need to do on the way. There are limitations (we will come to them later), but major functionality is there. Out of the box you can get the current document and the selected text. You can also manipulate the document in various ways - inserting text, inserting images, and inserting tables. This covers a surprising amount of cases.
The add-in is just a web page, so can be deployed like any other web page. You then add a manifest file to Word (which can be done at your organisation level if you are deploying across a business) which points to your webpage. When you load up the add-in, the manifest file is read and the content is pulled in from the URL. Easy.
You can also deploy the add-in to the Office store, which is a great way to get your product in front of a wider audience.
We’ve touched on some really great benefits to using Office Add-ins, but let’s list them out:
There are some limitations to be aware of:
San Digital is a software consultancy, however, we do have a test product of our own called Bot or Not which we have written about before. It uses sentence probabilities, perplexity calculations and a sprinkle of magic to determine if words were more likely written by a human or a machine. We think it works pretty well! It is also a prime candidate to be turned into a Word Add-in for the following reasons:
The app isn’t too complex, with a few simple controls, but by integrating it into Word we can streamline it even more. The aim is to integrate tightly with native Word functionality to streamline our workflows.
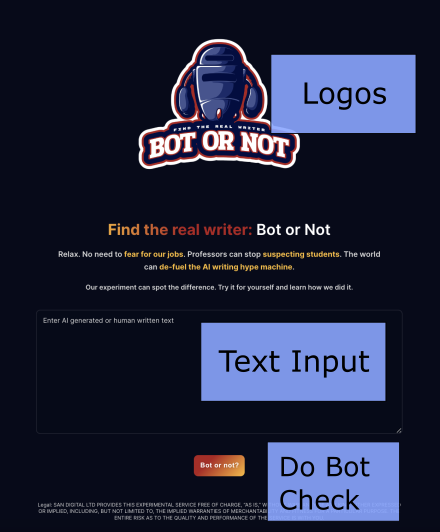
The web version we started with:
And the Word version we are going for:
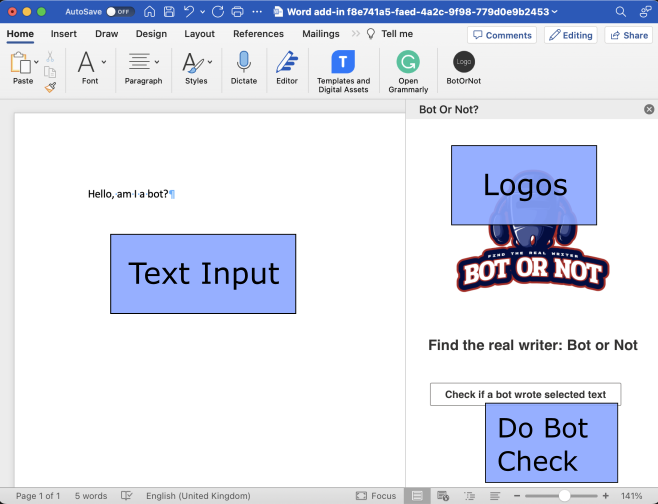
You can see how we translate our web text input to now use the Word document as our text input, and we switch themes from dark to light to fit in with Word’s light colour palette.
The workflow of our add-in is fairly simple. When the user clicks on the button to check the text for bot-isms we:
All this is done within Word itself, and the user never has to leave the app.
If you’re a developer, let’s show you how we’ve done this. If you’re not, skip to the conclusion where I make one more impassioned plea to use Add-ins.
We started with Microsoft’s Quick Start kit and tweaked it a little to make sure we could use the latest version of React and Typescript. And then we could pretty much get on with writing it, as it was just like writing any other React app at this stage. The major difference was debugging, which the quick start kit had set up for us to spin up an instance of Word with our new add-in inside when we run npm start. This was really useful for debugging and building the components out, as it comes with hot reloading so you’re never too far away from seeing your changes.
The interesting part of grabbing data out of Word looks like this:
return Word.run(async (context) => {
    const doc = context.document;
    const originalRange = doc.getSelection();
    originalRange.load("text");
    await context.sync();

    return originalRange.text;
});
Word.run comes from the Office JS API and takes a callback function. Think of it as prodding Word to wake up here and when it’s ready call us with its context. Once we have that context we can do things with it, like grab the document and the selected text. The await context.sync() is where we tell Word to go and run those commands to get the selected text we want. Now this text is in our React app, we can pass it to an API and process the results as you would normally.
We chose to deploy it as a static site from an AWS S3 bucket, but you could use any hosting provider you like. Word looks for a manifest.xml file when it opens up our add-in. The manifest file tells it the icons to use, which tab in Word to show the icons and where to go to load the files for your add-in. The starter kit comes with a handy webpack config file to churn through your manifest file when you build for prod, substituting out the local environment for your production environment.
For example, the manifest file defines the entry point into your add-in:
<DefaultSettings>
    <SourceLocation DefaultValue="https://localhost:3000/taskpane.html"/>
</DefaultSettings>
This is what we want when running locally so we can run it on our machines. We want something different when it’s deployed as we want the files to come from a web server instead. The webpack config defines these strings:
const urlDev = "https://localhost:3000/";
const urlProd = "https://www.sandigital.uk/botornot"; // CHANGE THIS TO YOUR PRODUCTION DEPLOYMENT LOCATION
During the build process the script will do a switcheroo on the dev and prod URL, so the manifest file ends up looking like this:
<DefaultSettings>
    <SourceLocation DefaultValue="https://www.sandigital.uk/botornot/taskpane.html"/>
</DefaultSettings>
This is now right for our production deployment! And with that our app is complete, having made the leap from a website to a Word add-in.
I’m a big fan of Office add-ins. They can supercharge your business flows or put your product in front of an audience in a more convenient way. From a development point of view, they are really nice to develop and you can concentrate on creating a great product rather than wrestling with memory management or ugly APIs. You can see our source code for the bot or not add-in here: Github or feel free to get in touch if you want to chat to us about building an add-in for you!
Let’s do something great